The following explains how to connect GigE cameras to your Scanbox. If you have trouble following the instructions below just let me know — I can help remotely.
ScanBox has the ability to acquire images from cameras synchronized to the frames of the microscope. We typically use one camera to monitor eye movements and a second one to monitor the movement of the ball, but you can add more if you desire so long as your hardware can keep up with the data stream.
Any GigE camera supported by the Matlab image acquisition toolbox should work, but we have been using the Dalsa Genie series successfully. In our current setup, we use an M640 camera for monitoring the ball and a M1280 to monitor the eye.
We have a dedicated Ethernet port for each camera, both set up with static (or persistent) IPs. To begin, follow the instructions in the Genie manual to setup the persistent IP addresses for your NIC interface and card. As an example, in our setup, one NIC has the IP 10.20.1.1 connected to a camera with 10.20.1.2 (mask 255.255.0.0), and the second pair has a NIC with 10.19.1.1 and a camera with 10.19.1.2 (mask 255.255.0.0).
Once you are done, start the Dalsa Network Configuration tool, and you should see both of your cameras show up in blue, as shown in the figure below. If any of them appear in red, or do not appear at all, something is wrong. You can find the Dalsa Configuration Tool can be found under All Programs -> DALSA -> Sapera Networking Package.

If you get to this stage, you can test if the cameras are working within Matlab. First, make sure you have the image acquisition toolbox. You should have also downloaded the GigE Vision Hardware support package by following these instructions. Restart Matlab after downloading the GigE support package. Launch the image tool in matlab (by typing imaqtool in the Matlab console), and you should see both cameras listed on the top left.

If this is the case, you are ready to move to the next step. Quit Matlab and launch the CamExpert and configure the cameras so that acquisition can be triggered. This is done by settting the Trigger to True and Trigger Source to Input 2, as shown below:

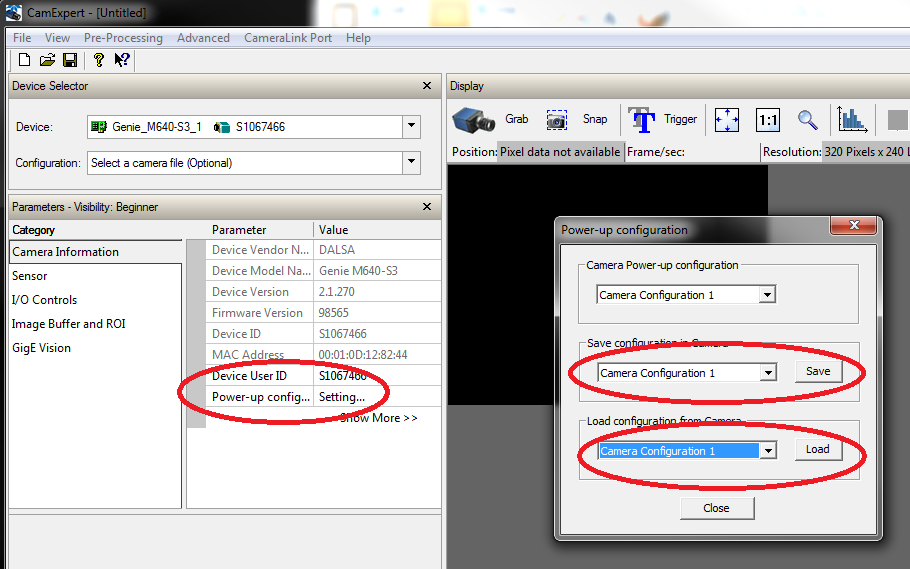
After this configuration is set up, you should save it as “Camera Configuration 1” and make it the default configuration when the camera is powered up, by going to the Camera Information section on the left and clicking on Power-up config setting:
The final step is to let Matlab know which camera is which. You do this by editing the configuration file and providing part of the name of the camera that will be in charge of eye and ball movement, as well as turning on the flags for the cameras you want to use.

In this case, the M640 will be used for the ball and the 1280 for the eye. After editing the scanbox_config.m file you can start ScanBox and both camera boxes should be enabled. (These fields will show up only if you are running the latest version of Yeti). If you hit the preview button you should be able to see a live feed of the corresponding camera. If both cameras work you, can proceed to the final test.
The final step is to make sure both cameras are working. Select a ROI for both cameras by clicking the appropriate button and dragging the ROI to the desired location. Check both of the ‘Enable’ boxes to tell ScanBox that you want to acquire data from the cameras. Finally, collect 100 frames by setting the total frames field to 100 and hitting the grab button. You should get two additional files — a *_ball.mat file and an * _eye.mat file. These should have the imagery and the total number of entries should match the number of lines collected (they may contain an excess frames of 1 or 2 at the end that you may ignore.)
A note about the triggers sources: the rightmost connector on the ScanBox provides a trigger signal at the same frequency as the frames of the microscope. We use it for the eye camera so we get an eye position at each frame. The connector next to it provides a signal at twice the frequency; we use it to trigger the ball camera.
Happy tracking…
