If you are already familiar with Scanbox on the NLW standard system, you will find it very natural to use the new options available in the mesoscope.
When Scanbox is configured to operate the mesoscope, you will find a new panel giving access to the features that go beyond those of the standard configuration:
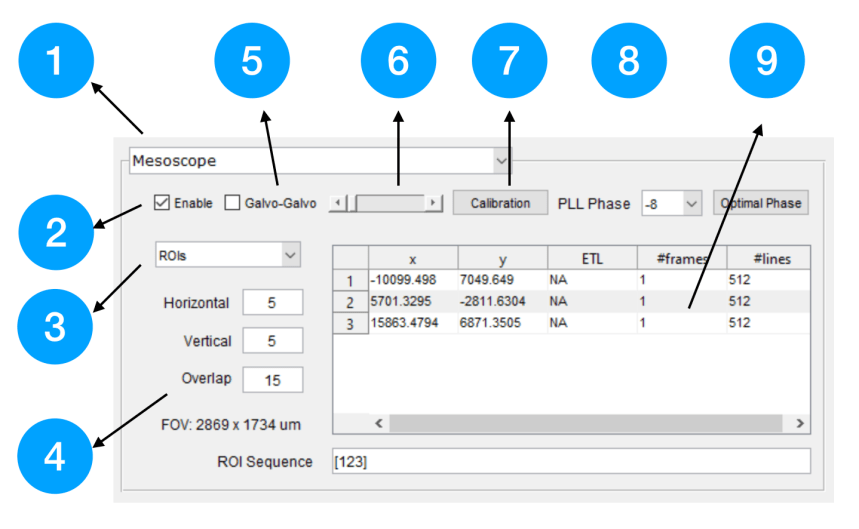
Here is a brief description of the various controls:
- You arrive at the Mesoscope panel by selecting Mesoscope in the pull-down menu for panel selection.
- This button, allows you to enable the Mesoscope functions. When this box is unchecked, the microscope functions exactly the same way as the standard system.
- This pulldown menu allows you to select between different type of scanning modes. At the moment there are two “Panorama” and “ROIs”.
- When in panorama mode, you can tile a large field of view. The tile size is determined by the magnification and number of lines of the frame. Overlap is the size of the overlap between tiles in pixels. Once these fields are selected the total size of the panorama to be created is shown in the FOV field. In this case, our panorama will cover 2.8 x 1.7mm.
- Because the mesoscope has two galvos and one resonant mirror we can also perform galvo-galvo imaging. Checking this box enables galvo-galvo imaging. The FOV will be matched to that of the galvo-resonant FOV.
- This slider allows to compensate for phase delays in galvo-galvo imaging.
- The system can perform calibration of the galvo mirrors. This ensures that stitching of the tiles in panorama mode is nearly perfect.
- The mesoscope also has an on-board PLL to optimize the phase of the sampling of the PMT amplifier signals with respect to the laser pulse.
- Selected ROI positions are shown in the ROI spreadsheet.
Focusing after enabling mesoscope and selecting a panorama scanning mode will bring up a new window like this:

Of course, at the beginning there will be no ROIs displayed (the green rectangles on the image). Instead, you will only see the background (the colormaps are user selectable).
After clicking the “Add ROI” button a new ROI will be dropped on top of the panorama. You can drag and position the ROI anywhere you want. Once you are done, you double click on the ROI.
After the ROIs are positioned, you can switch the mesoscope viewing mode to “ROIs”. Now, when you focus (or grab), the scope will scan the ROIs in sequence. The incoming data will be displayed in within the ROI rectangles. During scanning, you can drag the position of the ROIs in real-time — this allows you to search for the brain area of interest and fine-tune the position.
Once you are done, you can run your experiment. If you want to use a different set of ROIs, you can move them (drag and drop) or delete them (using the “Delete ROIs” button) and place some new ones.
The incoming image stream will also be shown in the Scanbox main window (although you can disable that display as it is does not add additional information and viewing the data in sequence is not tremendously pleasant).
You can also view the ROIs side by side by hitting the “Toggle View” button. In which case, you will get a view like this:

In this case, we had four different ROIs.
The mesoscope also offers the possibility of doing glavo-glavo scanning with a low repetition laser for 3p imaging. The size of the FOV in the normal resonant-galvo and galvo-galvo scanning modes are matched. Below are two images displaying the same FOV using these two different scanning methods.
Here is resonant-galvo:
and galvo-galvo:

The ROIs can also be assigned different depths. I am currently working on the best interface to do this and will update this blog with the information soon.
The format the files are saved is the same as before (binary *.sbx), except that there is additional metadata regarding the position and number of ROIs and their depths.
I will devote a separate blog to the analysis of mesoscope data (it is similar to the one for volumetric data — splitting the file into ROIs, processing those individually, and merging the results at the end).
Development of mesoscope software features is ongoing — you can add your wish list in the comments section below.
